Thursday, January 14, 2021

Your Classmates Images

Every Semester I pick some images to display or go into my file for reference. This semester (Spring 2010) I will post them here to represent the learning experience of this semester. Good job to those who got in and for those who didn't: "shoot more!"


I looked these up to give you some ideas for multiple exposure...


Tara Prades -Multiple Exposure

Farshad Soheili -portrait


Shirley Perez -self-portrait


Crystina Cho -multiple exposure


Nicki Katz -motion (camera still)


Crystina Cho -grey card test


Sami Rodriguez -environmental portrait


Lisa Lautman -Multiple exposure


Eunice Orantes -pan


Jacob Cohen -self portrait


Eunice Orantes -Great Depth of field f22


Erik Engle -pan


Shelley Hayashi -environmental portrait

Wednesday, January 13, 2021

Assignment #1 Depth of Field

Your first assignment is “Depth of Field”.
Depth of field is regulated by the aperture of the lens, distance from the subject, and the focal length of your lens.
Read the information in your book about the lens and depth of field.
f-4, shallow depth of field, (3:00 PM)
f-22, great depth of field

Photograph the same ("non-moving") subject in three set-ups without moving the camera position. Thinking in terms of distances from the camera, try sensing a foreground, middle ground and background in your shot. Look at the lighting and make sure shapes are being distinguished. Focus on the foreground or near middle ground. Do not change your focus once you begin shooting. Before you shoot make sure your exposure range will work for the light you choose. You may want to start wide open (f2.8 or 4) and check with your meter to make sure that your shutter speed will match the scene on both ends of the scale for your ISO. Bright sunlight may not be the best choice for this assignment.

First use a wide f–stop (2.8 or 4 ). Adjust the shutter speed to get a normal exposure. Manually focus and do not change your focus for the rest of this set of shots. Then take a shot at f-8 and finally at f-16 or 22 or whatever the smallest aperture your lens has. Changing your shutter speed to create an equivalence throughout (example: add three stops with aperture, take away three stops with shutter to keep equal amount of light). Take all the pictures of the same scene.

After shooting your initial set, create a variation. If you have a zoom lens set your lens at 50 mm for first set of shots and for a variation zoom in at least to 80mm and repeat the first part of the assignment. If you don’t have a zoom, but a fixed lens, then move into the foreground object as close as it will focus and repeat the first part of the assignment. Try macro if you have it.
After shooting your 6 technical images, divide the rest of the roll into two parts  (say 15 and 15) and shoot half as great depth of field and half as shallow depth.


Process your film, scan an send me the 6 images as well as 4 great depth and 4 shallow depth images.


Shot count:
1) Great depth of field (f16- 32)
2) Medium depth of field (f8)
3) Shallow depth of field (f1.8- 4)
4-6) Closer Distance or Zooming in to subject. (3 images at varying f stops same as above.)
7-21) Great depth of field of anything that interests you- look for interesting light, and subject matter
22-36) Shallow depth of field- use a large f-stop opening like 1.8-4 to give you a soft focused background.


Include a paragraph describing what you learned with your scans.


Here is a set of images showing what the Depth of field part of the assignment (with variation) should look like:

f22 at 1/50 (great depth)

f9 1/320 (medium depth)

f5.6 1/800 (least depth for the lens I was using)

Moving in as close as this lens could focus...for a slight variation:

f5.6 at 1/50

f9 at 1/250

f22 at 1/640


For a more technical interpretation of Depth of Field visit:

Depth of Field digital but good
https://www.youtube.com/watch?v=RDXLGOo-fyc


https://www.youtube.com/watch?v=34jkJoN8qOI

or:

http://www.cambridgeincolour.com/tutorials/depth-of-field.htm

Lenses and Perspective:

https://www.youtube.com/watch?v=QsrNjycYUdQ 

Split Grade Printing:

https://www.youtube.com/watch?v=KlVSdiEhafA

https://www.youtube.com/watch?v=TPznFhy-CIc

Tuesday, January 12, 2021

Second Assignment-Motion

"Panning the camera"        Levon Parian

Your second assignment is “Motion” and I would like you to think about capturing movement on film by experimenting with your camera’s shutter speeds.

Remember a longer shutter speed refers to the shutter remaining open to light for a longer time. To compensate for longer exposure time, use a higher f-stop number (smaller aperture) or change the time of day you are shooting.

Try two different types of shots to create motion: First move the camera at the same speed as a moving object and take its picture. This is called “panning” the camera. When panning, make sure that you pre-focus and pre-judge your exposure and mark a spot where the moving object is going to pass near you. Follow the moving object and take the picture on your mark continuing to follow the object after the shot to keep your action smooth. Try panning at 1/500, 1/125. 1/60, 1/15 and 1/4 of a second.

Make sure you write down all the information on each shot so that you can go back and see the affect each shutter speed has on the film. Also don’t forget that if your subject is close to you and moving quickly you will have a different affect than if it is further away and moving slowly. Stick to the same subject for a set of exposures so that you can compare the effect of the different shutter speeds. Always safety first, remember having a camera in your hands does not shield you from an on coming vehicle!


Subject moves          Levon Parian


Next photograph motion with your camera in a stationary position and allow objects to move in front of your frame. Place the camera on a tripod or some stationary object and if you have a shutter release cable use that to reduce the chance of camera shake. Once again bracket the same shutter speeds and f-stops as the pan. 1/500, 1/125, 1/60. 1/15, 1/4.

For the next 8 shots of your roll try the Bulb ("B") feature. Here the shutter will remain open as long as your finger is on the shutter. Try some shots moving the camera and also try some with the camera on a tripod or stationary position. Finish the roll with anything related to the shutter and movement.

Darya Jitmetta -Bulb (camera stationary)

Look for interesting solutions and ideas; I want your pictures to start reflecting an inquisitive train of thought and exploring visual concepts. Think about how the world around us is constantly moving. Use depth of field to isolate your subject and create a poetic interpretation. Do not use flash on camera. Hand in all the 5 pans and the 5 camera stills, and 2 Bulb shots one with camera moving and one with camera still. Add any 3 shots that you like after that.

Information on long exposures:
https://www.picturecorrect.com/tips/how-to-expose-film-correctly-at-night/

Monday, January 11, 2021

assignment #3 is Portraiture.

environmantal portrait of - Matisse by Henri Cartier-Bresson


I would like to see some creativity here...
Shoot all three and make a print of the following categories:

1) Environmental - Have your subject in their own environment
or place them somewhere that adds harmony or even conflict to
the subject. Questions to ask yourself- what are they
wearing? Who are they? What special ideas do I want to
present to the viewer about this person?
Try different shutter speeds and f- stops for affect.


Picasso by Newman

2) Close-up - Usually this means a shot where the head fills
the frame and it may or may not include the shoulders. Be
careful with this one. Longer lenses 80 mm+ usually work
best, but I know some of you only have 50mm (normal) lenses.
Also be aware of harsh shadows on the face. Try to find a
place where the light bounces off a white wall so the the
light has a nice even glow but not direct sunlight. (This
will keep the squinting down too). Bracket!

Carolyn Smith (portrait assignment Spring 2007)


Self portrait Graham Nash

3) Self Portrait- this may be the hardest one for most of
you. First think about an interesting way to present
yourself. Then find interesting lighting. A tripod will help
and most of you have a timer on the camera so that you can
trip the shutter and run to the other side of the camera.
Mirrors are OK and so are images that imply your presence.
Plan this out so you don't get a bunch of backs and “oops” shots.

Bracket and use different shutter speeds to enhance the idea
of your picture. We now are getting to the point where I need
to start seeing some creative solutions to these assignments. Composition, lighting, subject, and tonal quality will be important in my grading. Hand in 3 images of each part of the assignment: Environmental, Close up and Self.  The first two should be of 3 different people and the self portraits should be of 3 different set ups.

Sunday, January 10, 2021

Assignment #4 is Multiple Exposure.

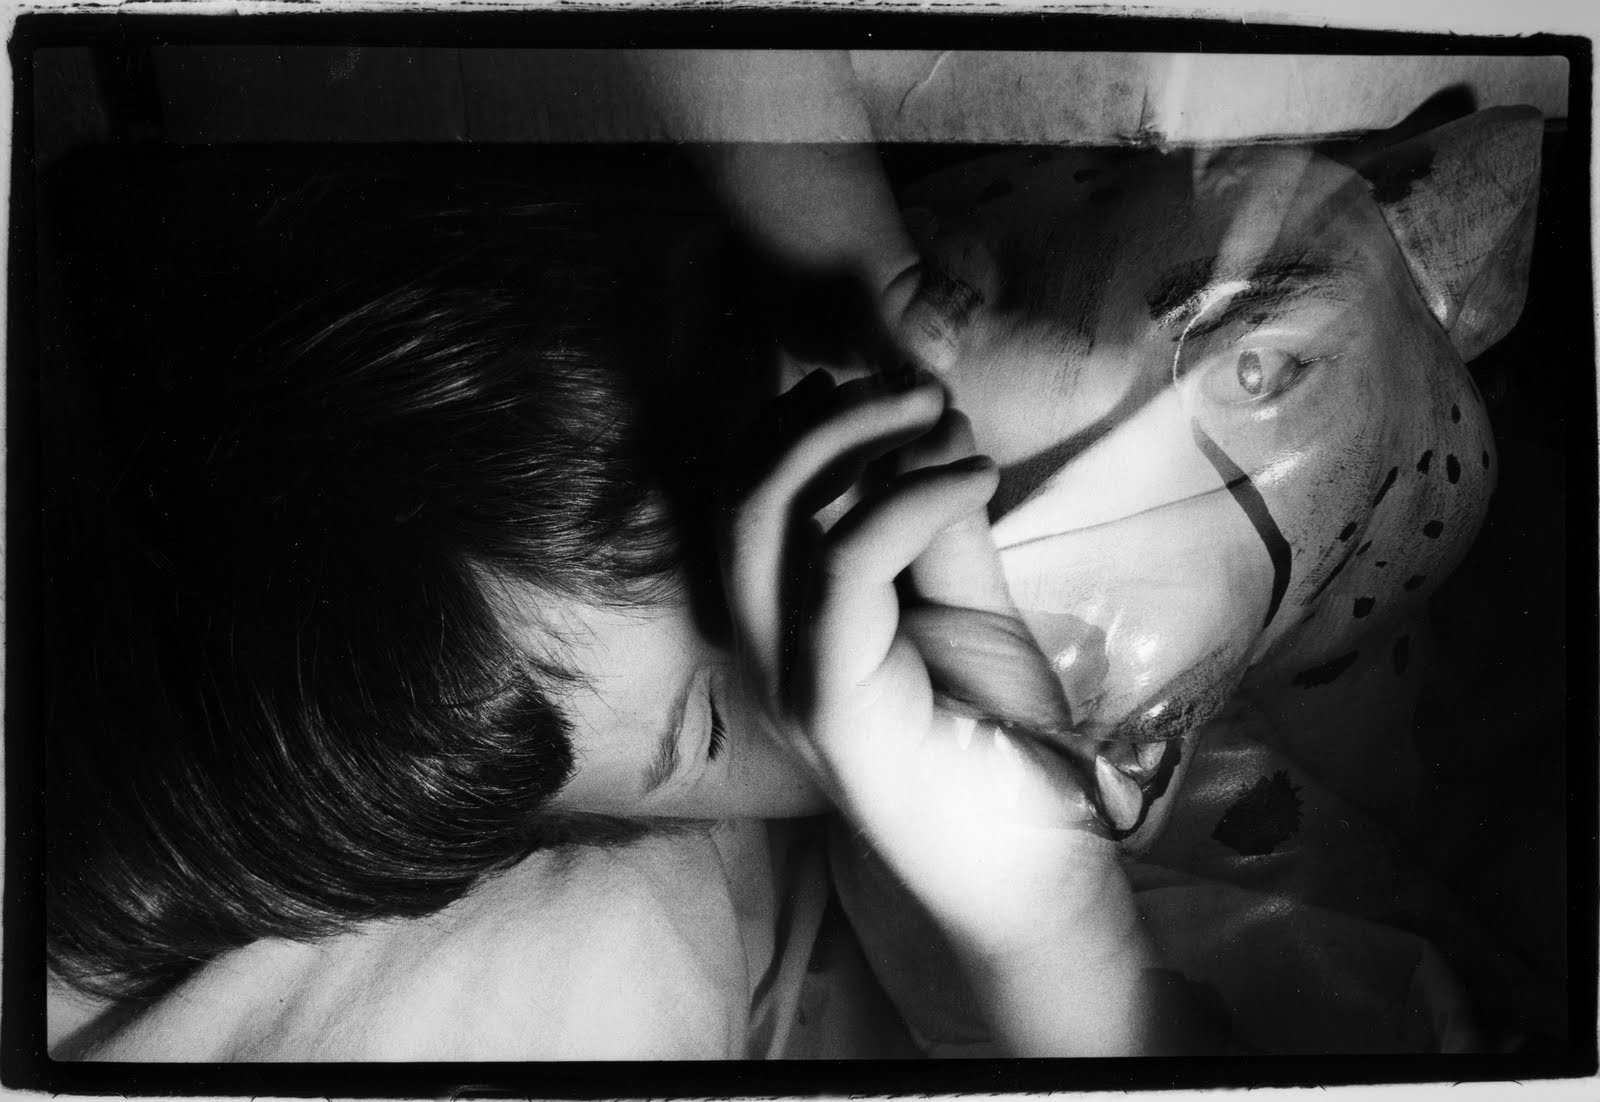
Duane Michals -Magritte with Hat

For this assignment, I want you to experiment with long shutter speeds, blurs, and double exposures. Hand in 6 images of your choosing, concentrating on interesting accidents, compositions and juxtapositions of subject matter. You will be graded on the print quality as well as the creativity you present.

Remember the grey card test and how you were asked to shoot without looking through the viewfinder? Think along those lines, when you are shooting, but always looking for interesting and unusual subject mater to layer on top of one another. Look for contradictions in texture, light and subject.

Here are some ideas on how you can create these affects:

BULB

When you press down on the bulb feature, your camera’s shutter remains open until you release it. Some cameras have a lock you can use to keep the bulb open while you run around and paint with light…

There are many ways to utilize the painting with light idea. You should make these pictures either at night outside, or in a darkened room inside. Take some images with the camera stationary and some with the camera moving.

For the stationary version, set up the camera on a tripod or solid object, if your camera does not lock in the bulb position, get a friend to help or go with a very long exposure (5 seconds or whatever your meter might say the ambient light is). Walk into the scene and flash (with a small hand strobe or a flashlight) objects or people in that scene. If the scene is dark enough, you can leave the shutter open long enough to light much of the scene. Be careful of exposure- overexposing could ruin the affect.

Another way to use bulb involves moving the camera. Hold the camera shutter open on bulb and walk around in a dark room or outside and flash in something. In other words, you could open the shutter on a city or street scene outside keeping your finger on bulb, cover the lens move the camera and either shoot some other scene (on top of the old one) or flash in something into the scene.

Experiment with these ideas and see what you can come up with. I would like to see your subject matter transcend daily existence and become fantasy, poetry and down right strange! Three prints to hand in with any technique that excites you.


Joseph Galli (Bulb assignment -camera stands still- Spring 2007)


Nightmare (bulb-camera moves) Levon Parian

RE-SHOOT A ROLL

After shooting a roll of film, re-shoot it by pulling out the leader, and loading it again. If you want the frames to match up, mark your camera and roll of film where the teeth of the take-up roller and your sprocket holes meet. Do this the first time you load it, so the second time you shoot the roll you have a guide to match up all the frames.

Mind Ray (film marked and re-shot to keep frames consistent) -Levon Parian

Swedlund's Barn, 1979 (Re-shot with unmatched frames) -Levon Parian

DOUBLE PRINTING YOUR PAPER

For added interest, you can double expose your paper under the enlarger. Find two images that work together and print them on the same piece of paper making them into a single image. The way I would want you to work this technique is to sandwich two negatives on top of each other in your negative holder. Do this on the light box so you can see what might happen... remember to place highlights over shadows to get interesting combinations and be careful not to pick up every piece of dust on the light table, also be careful of fingerprints.

Hope (sandwiched negatives) -Levon Parian

Hand In The Sand (Double exposure in camera and sandwiched negative) -Levon Parian


Let's see what kind of great stuff you can come up with! This should lead you into your final series project. Hand in 6 images of your choosing in one folder.

Historic - Oscar Gustave Rejlander:  https://www.youtube.com/watch?time_continue=15&v=gPGLTtINJBU
For reference check out Jerry Uelsmann's multiple printing technique and work:
https://www.youtube.com/watch?v=TCQQlFYbH4w&feature=fvwp&NR=1
His short explaination:
https://www.youtube.com/watch?v=MsVDXjthsaU

This is a good video on Uelsman's history:
https://www.youtube.com/watch?v=iyR65PeAEEg

Maggie Taylor:  https://vimeo.com/72831294
https://www.youtube.com/watch?time_continue=15&v=NNBnvVfMBIY

Here is some information on technique (not sure if I like the image made, but it's a rare example of how to:)  https://www.youtube.com/watch?v=-LPEqTVeg-Y&list=RDMsVDXjthsaU

Also look at these and even add some of your own:
https://www.google.com/search?biw=1390&bih=1091&tbm=isch&sa=1&ei=JmULWrjxE9GojwPzsZfIBw&q=B%26W+double+exposures&oq=B%26W+double+exposures&gs_l=psy-ab.3...24085.28514.0.28851.16.16.0.0.0.0.75.1028.16.16.0....0...1.1.64.psy-ab..0.2.143...0j0i67k1j0i8i30k1j0i24k1.0.MAWEStWEyuc#imgrc=4jYUotcHGXA54M:

Friday, January 8, 2021

Assignment #5 Narrative or Non-Narrative Series

Vlad Artazov-Nail Photography Series (non-narrative)

Victor Perez- Coffee (narrative)

Jordon Ross-Favorite Desert (non-narrative)

Create a series of 6-12 photos that are related in a narrative or non-narrative way. This assignment is about coming up with an idea and following through with final prints. "Making" pictures rather than just "taking" them. Keep your idea simple and "do-able". Look around you for interesting objects and people. Make stories revolving around them. Think out and draw your idea to see how you can represent it visually. Look for interesting angles that will enhance your story and still make each image interesting in itself. Use what you learned about depth of field to isolate your subject and use the rule of thirds to make your viewer's eye search through your image for more clues to the story... Create ghosts and mysteries with long exposures... The more layers of information you create, the more impactful the images.

A narrative story has a beginning, middle, and end. So if you were to take 5 shots of some kind of event that the sequence needed to be in a specific order; 1-5 to get the story across, that would be a narrative series. One example would be if you photographed someone who went to the market to get groceries and then came home, put some of the groceries away and then cooked dinner for a friend who came and ate the meal-- that would be a narrative series.  Also think about Duane Michael's photo fictions like, "Death comes to the lady" or his miniature bathroom series.

A non-narrative series would be independent images that do not exist on a time line but have something in common binding them together. Usually you could rearrange the order of these images and the meaning would not be affected. For example: 6 photographs of surfers on the beach each with a different type of surfboard. The order of these images could be rearranged and still have the same meaning. So the topic or subject of the non-narrative series is important. It could be the lighting of the subject, or the way the photo is taken, but there must be some consistency to the images for the viewer to realize that they are a series. Distance from subject or size of the subject in the frame is also a factor in consistency. Overall the story takes place in each individual image and when combined they convey a consistent idea. Unlike the linear progression of images of the narrative.

Come up with something that interests you and also is easy to accomplish. I am more interested in seeing expressive camera angles, and the use of depth of field and shutter blurs to make simple ideas come to life! You will present your series in class December 7 or 8 depending on if you have class on Monday or Tuesday. 

Ryan Alberts- soldier boy (narrative)

István Halas: The answer, 1987 (non-narrative)


How to Make a Storyboard
  1. Step 1: Create a Template. Draw a series of rectangles on a piece of paper, as if you were creating a comic strip. ...
  2. Step 2: Give the shot description under each rectangle that corresponds to that scene.
  3. Step 3: Sketch Out the Story. ...
  4. Step 4: Add Notes.
The top row that I drew on the board is a narrative  with a linear time line. (can't rearrange these in order)
The bottom row is a non- narrative series. These can be rearranged without ruining the story because each image represents the idea internally.

Remember you are "making" images, not "taking" them.
Storyboard from class

Wednesday, January 6, 2021

Directionality of light defining surface

This is a series of images representing variations of light on a stucco wall. Notice the differences and how they affect the definition of the surface in B&W.
Early morning, slightly directional but mostly flat light- sun just over the left shoulder.
Same time as above, but camera moves 45% to the right, giving the sun more angle in relation to the wall. Moving around your subject changes your angle of view and the relationship of highlight and shadow.
Later in the day, sun is at a right angle to camera. The light is scraping along the edge of the wall defining every variation in texture. This light is called "directional" or "side" lighting.
Shade. Notice that texture is mostly defined by color variation. Even in shade there are highlights and shadows, but they are less intense, compressing the gray scale.
Shade with bounced (reflected) light from a sidewalk. Notice the added spark of highlight which gives life to the texture and stretches the gray scale out towards the highlights.

The directionality of light defines the look of your image. Walk around your subject and see how light bounces and reflects off of it. An interesting idea must be defined by interesting light.